


Ansel Adams Zone System - Advanced
"Extending Your Creative Options!"
|
If you find the extensive information on this site useful, please consider supporting the maintenance costs by making a donation. Thank You.
|
The Zone System, as described on the other
pages of this site (Zone System History), combined
with the calibration of your methods to produce a true film speed and correct
'normal' development (Film_Testing),
provides you with a working method that gives you control over exposure
and development of the film for 'normal' working. For most people, this
will have produce an immediate increase in the quality and accuracy of their
negatives (and hence their prints). It also gives you the confidence that
you require, something that many photographers never actually gain (sadly)
even after many years in the game.
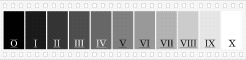
Once you are confident with the principles of metering, placement, fall, analysing various scenes/subjects with a meter and obtaining the required results on film, it is time to expand your knowledge and extend your creative options! The techniques that allow you to do this are the subject of this page. Subject Brightness Range (Subject Contrast) The two main things that determine the contrast of any scene/subject are: the lighting or illumination of the subject and the subject contrast inherent in the subject. Visual contrast is also influenced by our perception of the subject. For example, a black object next to a white object in flat overcast light (same light on both objects, no shadows) will appear to the eye to be of high contrast, black and white. However, a meter reading off each area will normally show a difference of only four stops, not the seven required to render these objects as we perceive them. Macro contrast The overall difference in brightness (luminance) from the darkest important area to the lightest important area is known as the macro contrast. The term brightness is used instead of the more accurate term luminance because it is easier to understand conceptually. For a 'normal' subject, this difference is usually considered to be 7 (seven) stops, i.e. Zone I to Zone VIII. This is a ratio of 128:1, the light area is 128 times brighter than the dark area. This range is used because it 'fits' the density range of 'normal' printing paper. You may find some sources ignoring the Zone I and stating that the range is 6 (six) stops. This is because Zone I is effectively black in a print, although the actual density on the print of a Zone I is not as great as paper Dmax (paper black). So some sources use the texture range as the important 'normal' range. I prefer to stick to the 'traditional' view that Zone I is important as it helps 'key' the other tones in a print, also sensitometry uses this range. The important thing to always remember for practical work is that the translation of macro contrast in the subject through to the negative, is controlled by the exposure and development of the film. In particular: Exposure controls the shadow values Development controls the high values This is always a two stage routine! Micro Contrast The important areas of the subject that you require to have detail in will reproduce that detail in the print if accurate exposure and appropriate development are given. The detail or 'texture' in the various areas of the subject is know as micro contrast. A very important practical point to understand is that anything which affects macro contrast also affects micro contrast! So if you use a technique that reduces the overall contrast in the scene, you will also reduce the contrast of the textures in the individual scene areas. Similarly, if you increase the macro contrast this will increase the micro contrast. Sometimes, your creative decisions might be geared towards controlling micro contrast rather than macro contrast. For example, the use of coloured filters to alter the tonal rendition of the subject areas is altering micro contrast, but may not change the macro contrast. For example, a detail of brown wood with green lichen creating patterns on it, in soft light, might be handled in various ways depending upon what you want to do e.g. Increase the macro contrast with development (see below), increase tonal differences with filters (red, orange, or green) to change the micro contrast, or use a combination of the two. Film Development Development of the film is used to convert the invisible latent image, formed at the time of exposure, into the visible image we see on the negative or transparency. The quantity of developed silver produced in the negative is determined by the amount of exposure combined with the time of development. An area of the negative that receives lots of exposure (a high zone, e.g. Zone VII) will end up with more density (more silver) than an area that receives little exposure (a low zone, e.g. Zone II). The time of development will normally be the same for the whole negative but more developed silver (density) is produced where more silver halides were exposed to light. Now if we think of this in a less technical way, the amount of development controls where a certain exposure zone will end up on the negative density scale. For a 'normal' subject (i.e one that you want to reproduce without development changes), exposed and developed for your 'normal' conditions (your EI and normal development time), each zone of exposure will be reproduced as the same zone of density on the negative. So for normal development, a zone III exposure becomes a Zone III negative density, a zone VI exposure becomes a zone VI negative density, and so on for each zone of exposure in the subject. The development is controlling where each exposure zone will be on the film's density zone scale. This term density scale is my own invention (as far as I know) it is not a strict technical term, more a useful conceptual/practical term. Increasing Subject Brightness Range When the subject brightness range is less than the seven stops of the 'normal' subject, we have what is called a short range subject, one of inherent low contrast. If your visualisation of this subject calls for an increase in the apparent brightness range, it is usual to use increased development of the film (you may of course visualise your image in whatever way you wish, there is no rule that says you must do this or you must do that, it is what you want that is important. The Zone System only gives you the knowledge and methods that allow you to achieve what you want, not a strict regime for set subjects.) Increasing the development of the film will move all the exposure zones higher up the film's density scale. However, they do not move by the same amount! For example, if you increase development sufficiently to move a zone VII exposure to the zone VIII position on the film density scale, you have moved it one complete zone. However, the zones lower than zone VII will move by less than one zone. In fact, as you move down the zones, the amount of movement gets less and less. So, in this example, the zone VII has moved a full zone (to density zone VIII) but a zone VI exposure may only move by one half of a zone (to density zone VI 1/2). The zone V exposure will move even less and a zone IV less than the zone V, until at the other end (zones I and II) there is very little movement at all (unless the development increase is very great). In this way you can expand the brightness range of a subject by expanding the film density scale. You are increasing the apparent contrast of the scene/subject. Development increases are known as expansions.
In order to make this controlable (control being the essence of the zone system), we make expansions in terms of zones. So we might have a development time for N which is 'normal', another (more) time for N+1 (normal plus one zone), a third for N+2, etc. (Although there are practical limits to how far you can go). If you want even more control, you might also have development times in half zones, i.e. N+1/2, N+1 1/2. You could go insane testing and never take a picture if you get too critical! Most people are happy to work in full zones with N+1 and N+2 as their practical limits. Some years ago, Fred Picker wrote of a method he used whereby he exposed two negatives on each subject: one he exposed 'normally' and developed for N, for the second he reduced the exposure by one and a half zones and gave that negative N+1 1/2. In this way, he (Fred Picker) obtained two very different negatives from which he could choose many printing permutations. In the end, it is up to you to evolve your preferred method, using the zone system as the basis. Reducing Subject Brightness Range The opposite methods apply when the subject has a brightness range that is greater than normal. If you find that your visualisation calls for you to compress the zones in the subject (usually because you want to retain detail at the extremes), i.e. the important high values are more than five or six zones brighter than the important shadow area, then it is necessary to reduce the development of the film. This is usually achieved in the first instance by reducing the time of development. Let's say you meter a scene and place a certain shadow on Zone III to retain good detail then, when you meter the high values, you discover that the lightest important tone you want subtle detail in falls on zone IX. You know that zone VIII is the upper limit for detail, therefore your high value is one zone too high. To reposition it you could lower the placement of the shadow by one zone (place it on zone II), but this would lose required detail that you want to keep so that option is not the answer. The alternative is to reduce the development of the film by the equivalent of one zone, thus lowering the value of zone IX down to zone VIII, which is where you want it. This one zone reduction is called N-1 development. Bear in mind that any reduction in development also affects every other zone, but by smaller amounts as you go down the zone scale. Thus, for an N-1 development at zone IX, the zone IX becomes negative density zone VIII. Any zone VIII in the subject will be lowered as well but by a smaller amount (say 3/4 of a zone), a zone VII area will go down slightly less again (say 1/2 of a zone), etc. for each zone. When you reach the darkest zones, III and II, the change is very slight and so can usually be ignored. Some people prefer to adjust their EI based on the development required (this is the basis of Phil Davis' 'Beyond the Zone System') and this is very sound from a sensitometric point of view, but does involve lots of testing. Using changes of EI with development does retain the desired detail in the shadows when you change development. These changes are usually in thirds of a stop, which requires the use of ND filters on 135 (35mm) and 120 formats due to the fact that the apertures are usually in 1/2 stops only. On large format cameras, the shutters can usually be adjusted in 1/3rd stops which allows precise refinements of EI to be made.
As you might expect, N-2 development reduces a subject zone X down to a negative density zone VIII, with a consequent lowering of all the other zones. Again, N-3 reduces a subject zone XI down to a negative density zone VIII. However, if you require such extreme reductions as N-2 or N-3, you might want to consider alternative development methods, such as two solution development or water bath development. Remember also that any change to the macro contrast affects the micro contrast, so extreme reduction of development may have undesirable consequences for the textures in a scene. In such extreme cases, you would also consider other ways of in-camera control such as latensification (pre-exposure) to add density to the lower zones and allow a less dramatic development change. To be quite honest, I think that if you are getting so exact as to have a different EI for every development combination, you are losing sight of the fact that the zone system was conceived to be a practical system that makes your life easier not harder! It is possible to take the whole thing to the Nth degree and some may want to do this, it is up to the individual. For example, the development tests you do require you to use one zone as a sort of 'pivot point'. For most this is zone VIII. So to determine N-1 development, we make a zone IX exposure produce a zone VIII negative density. To find N+1, we make a zone VII exposure produce a zone VIII density. Notice we are always aiming at the zone VIII density! However, I said above that the affect of development changes is not the same for each of the other zones. What this means is that the development time required to produce N+1 from zone VII to zone VIII, is not the same time that is needed to produce N+1 for a zone VI to go to zone VII (it is not enough). The same thing happens when using N minus development. The time required to lower a zone IX exposure to a zone VIII density, is not the same time that would be needed to reduce a zone VIII down to a zone VII! You can see from this that for a 'perfect' zone system that would cover every possible situation, you need not one set of development times (N, N+1, N+2, N-1, N-2) but a set of times for each zone you use as a 'pivot' zone. So, in theory, you need at least three development times (N, N+1, N-1) for each of the high zones! Also, if you use the variable EI method, you will need a separate EI for each development time. Phew! You would be carrying so much data around with you, you wouldn't have space for a camera! Then once you have done this for the full zones, what about the half zone steps? And the quarter zone steps? Get the point? You can go as far as you wish with this, and some people will want to for absolute control in all situations, but my experience indicates that it is not necessary to do this to produce excellent results. For most people, I advise testing for film speed (EI) and normal development at the least since this will immediately improve your negatives no matter what. Then, if you want to expand your technique, test for N+1, N+2, N-1, N-2 development based on zone VIII. Then in practice, simply adjust the shadow placement based on the development a scene indicates. Of course, you may find in the course of your own work that a zone VII 'pivot point' would be more useful to you due to the type of subject you prefer to work with. In that case base your development tests on the zone VII density (i.e. N+1 moves a zone VI to zone VII, N-1 moves a zone VIII to zone VII, etc.) A portraitist might want to use zone VI or Zone V as a 'pivot' because they work with skin tones most (zone VI for Caucasian skin, zone V for darker skin). The system is flexible enough for this kind of personal customisation. Also, as you do the tests, you may find data that answers some of the other times quite by accident. For example, an 'incorrect' N-1 test for a zone VIII 'pivot point' might give you the time that produces a correct N-1 for a zone VII 'pivot point', and so on. Don't ignore the results of 'failed' tests, check to see if the result is answering something else too! In this way, you may well build up results without too much extra testing. |
If you find the extensive information on this site useful, please consider supporting the maintenance costs by making a donation. Thank You.
|
||||||||||||||||||||||||||||||
This article must not be reproduced without the written consent of Les Meehan. |
All text and images found on these pages © Les Meehan 2010. The copying or distribution of any text or images, in part or in whole, from this website is strictly forbidden without the written consent of the copyright holder Les Meehan.

